

Layered Flavor Coffee Extraction Guide: Brew + Taste
Layered-flavor coffee extraction combines two separate controls: density order (which determines what you see) and extraction timeline (which determines what you taste). Get both right, and a single glass delivers bright acidity at the top, caramelized sweetness in the middle, and just enough bitterness at the base. A quick starter recipe: pour chocolate syrup first, add chilled steamed milk, then slowly pour a cooled espresso shot over the back of a spoon, and finish with a thin foam cap.
Three rules to keep in your back pocket before you start:
- Densest liquid first. Syrups and condensed milk sink; espresso and foam float. Build bottom to top.
- Chill your liquids. Cold increases viscosity, which slows mixing and holds layers longer.
- Pour over the back of a spoon. A slow, dispersed stream cuts turbulence at the interface.
Pro Tip: Cool your espresso shot to room temperature before pouring it onto a milk layer. Hot espresso carries enough kinetic energy to punch straight through chilled milk and destroy the separation you just built.
Table of Contents
- How do density and extraction timeline create layered flavor?
- What equipment and ingredients do you actually need?
- Four step-by-step recipes that teach layering and extraction together
- How do you adjust extraction settings to highlight a specific flavor?
- What pouring technique keeps layers from mixing?
- Why do layers mix, and how do you fix it fast?
- Allergens, sanitation, and tasting tips
- Key Takeaways
- Why layered extraction shapes how Thejcoffeecollection curates its products
- Ready to build your first layered drink with Thejcoffeecollection?
- Useful sources and further reading
How do density and extraction timeline create layered flavor?
Visually, layers hold because liquids differ in density and temperature. Sweetened condensed milk sits at the bottom because it is denser than milk or espresso. Microfoam floats because it is mostly air. Temperature amplifies this: chilling a liquid increases its viscosity, which slows diffusion across the interface.
Flavor layers work on a different clock. Coffee compounds extract in a predictable sequence: fruity organic acids dissolve first (Phase 1), caramelized sweetness and body arrive next (Phase 2), and harsh bitter compounds come last (Phase 3). The SCA’s recommended extraction yield targets Phase 2, where sweetness peaks before Phase 3 bitterness takes over. Below 18% tastes sour and hollow; above 22%, the cup turns dry and astringent.
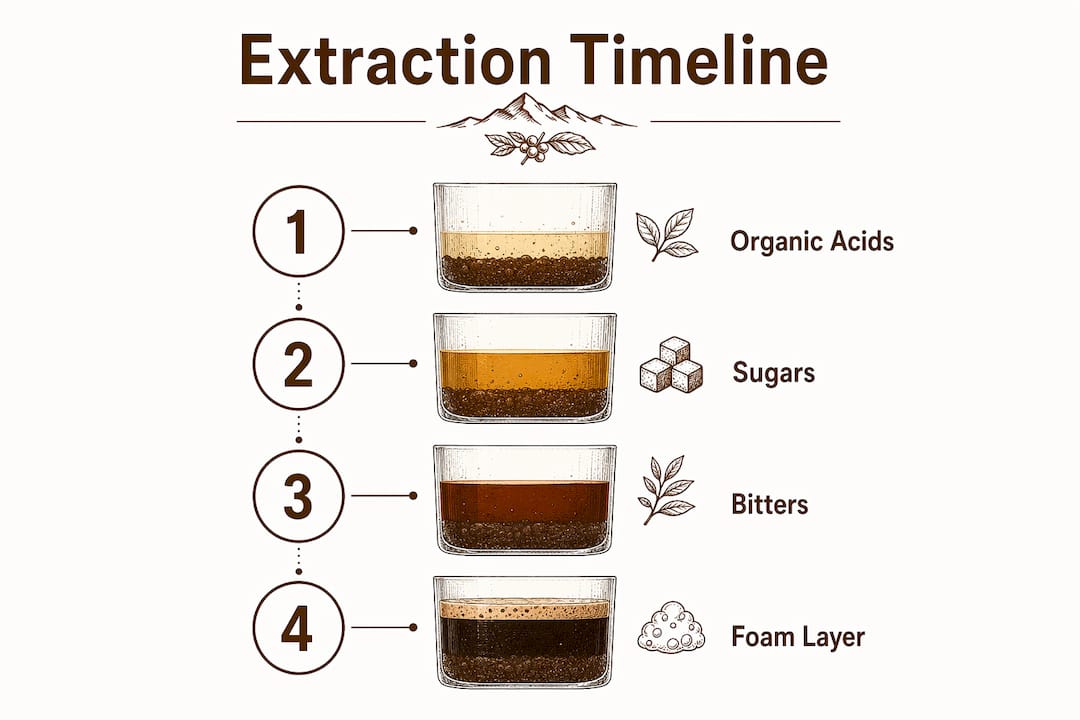
Water temperature and grind size control how fast you move through those phases. Higher temperature compresses the timeline, reaching Phase 3 faster. A finer grind exposes more surface area and speeds extraction. Grind uniformity matters as much as grind size: fines over-extract into Phase 3 bitterness while coarser particles are still in Phase 1, muddying the flavor layer you are trying to highlight.
| Method | Typical Extraction Yield | Dominant Flavor Phase | Notes |
|---|---|---|---|
| Pourover / filter | Typical extraction yield in the recommended range | Phase 2 (sweet, balanced) | Best for clean, layered flavor |
| Espresso | Typical extraction yield in the recommended range, compressed | Phase 1–2 rapid | Concentrated; cool before layering |
| Cold brew | Lower acidity | Phase 2 dominant | Noted for significantly lower titratable acidity than hot brew |
| French press | Variable extraction yield | Phase 2–3 risk | Coarse grind limits Phase 3 |
ITA Coffee on extraction control: “Controlling variables like grind size and water temperature lets brewers stop extraction at the sweet peak before bitter compounds dominate.”
What equipment and ingredients do you actually need?
You do not need a professional bar setup. A clear tall glass is non-negotiable — you cannot judge layer separation in an opaque mug. Beyond that, a bar spoon (or any long-handled spoon), a kitchen scale, a burr grinder, a thermometer, and a milk frother or steaming wand cover every recipe below.
Equipment checklist:
- Clear tall glass (12–16 oz)
- Bar spoon or long-handled spoon
- Kitchen scale (for consistent ratios)
- Burr grinder (flat burrs reduce fines and improve uniformity)
- Thermometer or temperature-controlled kettle
- Milk frother, steaming wand, or French press for foam
Ingredients to stock:
- Dense syrups or sweetened condensed milk (base layers)
- Whole milk (steams best for stable microfoam) or a barista-grade oat milk
- Quality espresso or concentrated cold brew
- Microfoam or lightly whipped cream for the cap
- Flavored coffee or tea for built-in flavor notes without extra syrups
For experimenting with different flavor profiles, Thejcoffeecollection’s single-origin sample pack lets you test how different beans respond to extraction before committing to a full bag. Viscous syrups work best at the base; thinner flavored syrups tend to migrate upward and blur layers. Store opened syrups sealed and refrigerated to protect flavor integrity, and always purge your steam wand before and after use to avoid cross-contamination between drinks.
Four step-by-step recipes that teach layering and extraction together
Recipe 1: Classic caramel latte macchiato
Ingredients: 1 oz caramel syrup, 4 oz whole milk (steamed), 1 double espresso shot (cooled), foam cap.
Brew a double espresso at 195–205°F with a fine grind (25–30 second pull). Let it cool 3–5 minutes. Pour caramel syrup into a clear glass, add chilled steamed milk, rest 30 seconds so liquid and foam separate, then pour espresso slowly over the back of a spoon. Total assembly: about 8 minutes.
Pro Tip: Rest the steamed milk for a full 30–60 seconds before adding espresso. The foam rises and the liquid settles, giving you a denser milk layer that holds the espresso on top.
Recipe 2: Chocolate cold-brew float
Ingredients: 1 oz chocolate syrup, 5 oz chilled whole milk, 3 oz concentrated cold brew (1:4 ratio, steeped 16 hours), whipped cream.
Cold brew’s reduced bitterness makes it ideal as a top layer — it stays visually distinct and tastes smooth rather than harsh. Pour chocolate syrup first, add cold milk, then pour cold brew over the spoon using detailed pouring techniques from this foolproof chocolate souffle recipe to control texture and flow. Crown with whipped cream. No heat required; total time under 5 minutes once the brew is ready.
Recipe 3: Hojicha layered tea latte
Ingredients: 1 tsp Thejcoffeecollection hojicha powder, 1 oz honey syrup, 4 oz whole milk (steamed), microfoam.
Whisk hojicha powder with 2 oz hot water (175°F — lower than coffee to avoid bitterness from the roasted green tea). Pour honey syrup into the glass, add steamed milk, rest 30 seconds, then pour the hojicha concentrate over the spoon. Hojicha’s earthy, roasted notes sit in Phase 2 naturally, so you get sweetness-forward flavor without fighting bitterness. Cream layers more sharply than milk here; use cream for a more defined visual split.
Recipe 4: Iced espresso with flavored syrup base
Ingredients: 1 oz vanilla or caramel syrup, 3 oz cold whole milk, 1 double espresso shot (cooled), ice.
Fill a glass with ice, pour syrup over the ice, add cold milk. The ice slows diffusion and keeps the milk layer stable longer. Pour cooled espresso over the spoon last. Wait 20 seconds before serving — the milk needs a moment to settle against the ice before the espresso fully separates on top. This is the fastest recipe to dial in for flavored coffee beans that already carry vanilla or caramel notes.
How do you adjust extraction settings to highlight a specific flavor?
The extraction basics come down to three levers: grind size, water temperature, and contact time. Finer grind = faster extraction = more Phase 2 and Phase 3. Coarser grind = slower extraction = more Phase 1. Water at 195–205°F hits the sweet middle for most methods; cold brew skips Phase 3 almost entirely by using cold water over 12–24 hours.
| Adjustment | Effect on Phase 1 | Effect on Phase 2 | Effect on Phase 3 | Best for |
|---|---|---|---|---|
| Grind finer | Faster through | Peaks earlier | Risk increases | Boosting sweetness |
| Grind coarser | Extends | Delayed | Reduced | Cutting bitterness |
| Raise temp (above 200°F) | Compresses | Compresses | Increases | Not recommended |
| Lower temp / cold brew | Slows | Extends | Greatly reduced | Sweet, smooth layers |
| Reduce contact time | Stays dominant | Limited | Avoided | Bright, acidic top layer |
| Bypass / dilute after brew | Preserved | Preserved | Diluted | Balancing a strong shot |
Quick per-method starting settings:
- Pourover: 1:16 ratio, 200°F, medium-fine grind, 3:00–3:45 total brew time
- Espresso: 1:2 ratio, 200°F, fine grind, 25–30 second pull
- Cold brew: 1:4–1:5 ratio, room temp or refrigerator, coarse grind, 16–20 hours
- French press: 1:15 ratio, 200°F, coarse grind, 4 minutes steep
When a shot tastes sour, grind finer or raise temperature slightly. When it tastes bitter, grind coarser, shorten contact time, or switch to cold brew. For layered drinks specifically, the coffee flavor profile of your bean matters too: a naturally sweet, low-acid single-origin will hit Phase 2 more cleanly than a high-acid washed Ethiopian.
What pouring technique keeps layers from mixing?
Assembly order is fixed: densest first, then heavier liquids, then concentrated coffee, then foam. Syrups and condensed milk go in first. Steamed milk or cream comes next. Espresso or cold brew pours last, over the spoon.
The spoon technique works because it disperses the stream and reduces kinetic energy at the liquid interface. Hold the back of the spoon with its tip just above the surface of the layer below, tilt the pitcher or glass slowly, and pour in a thin, steady stream. Pour height matters: the closer the spoon sits to the surface, the less energy the liquid carries when it lands.
Pro Tip: For iced drinks, angle the glass at 45° and pour against the inside wall rather than straight down. The glass wall slows the stream further and gives you cleaner separation than a center pour.
Assembly checklist:
- Chill all liquids that will sit below the espresso layer.
- Pour syrup or condensed milk into the glass first.
- Add steamed milk; rest 30–60 seconds.
- Hold spoon just above the milk surface, pour espresso slowly.
- Spoon microfoam gently on top — never pour foam from height.
- Serve immediately or within 5–10 minutes before layers begin to diffuse.
Why do layers mix, and how do you fix it fast?
Muddy layers almost always trace back to two causes: liquids at similar temperatures, or a pour that was too fast. Chill the denser liquid, slow the pour, and hold the spoon closer to the surface. Letting steamed milk settle 30–60 seconds before adding espresso solves most separation failures.
Espresso sinks when it is denser than the milk layer beneath it, usually because the milk is too warm or too thin. Let the milk cool, or switch to whole milk, which is denser than skim. A slightly cooled espresso shot also helps.
Taste problems:
- Sour / underdeveloped: grind finer or raise water temperature by 5°F.
- Bitter / harsh: grind coarser, shorten brew time, lower temperature, or substitute cold brew.
- Flat / no sweetness: check extraction yield — you are likely under-extracting Phase 2. Try a finer grind with a shorter steep rather than a longer one.
Before your next attempt, check:
- Are liquids at different temperatures? (They should be.)
- Is there enough density contrast? (Syrup vs. milk vs. espresso — not milk vs. milk.)
- Was the pour slow enough? (If you can hear a splash, it was too fast.)
- Is your grinder producing uniform particles? (Fines cause uneven extraction and muddy flavor.)
Allergens, sanitation, and tasting tips
Check labels before purchasing. Dairy appears in whole milk, condensed milk, and cream-based syrups. Nut-based syrups (hazelnut, almond) are common allergens. Thejcoffeecollection’s mushroom coffee contains functional mushroom extracts (Lion’s Mane, Cordyceps, Reishi) — review the product page if you have sensitivities or take medications that interact with adaptogens.
Keep glassware clean and dry before assembly; residual soap film breaks foam structure. Purge the steam wand before and after each use. Store flavored syrups sealed and refrigerated once opened, and discard any syrup that smells fermented or off.
A properly assembled layered drink holds visual separation for roughly 5–10 minutes. Serve immediately and use a long spoon so guests can stir layers together as they drink, which changes the flavor profile sip by sip.
For tasting, sip from the center of the glass rather than the rim to sample the middle layer first. Use the Coffee Taster’s Flavor Wheel to identify two or three descriptors per sip — chocolate, citrus, caramel — and write them down. Repeatable notes let you adjust extraction settings with intention rather than guesswork.
Key Takeaways
Layered-flavor coffee extraction requires density order for visual separation and extraction timeline control for taste, with the 18–22% extraction yield window targeting Phase 2 sweetness before Phase 3 bitterness takes over.
| Point | Details |
|---|---|
| Density drives visuals | Pour densest liquids first; syrups and condensed milk sink, espresso and foam float. |
| Extraction timeline drives taste | Acids extract first, sweetness peaks at 18–22% yield, bitterness dominates above 22%. |
| Three core rules | Densest-first, chill liquids, and pour over the back of a spoon every time. |
| Cold brew cuts bitterness | Cold brew shows significantly lower titratable acidity than hot brew, ideal for smooth top layers. |
| Thejcoffeecollection for ingredients | The single-origin sample pack and flavored coffee range let you experiment with extraction and layering without committing to one bean. |
Why layered extraction shapes how Thejcoffeecollection curates its products
Every product in the Thejcoffeecollection lineup gets selected with extraction behavior in mind. Single-origin beans are chosen partly for how cleanly they express Phase 2 sweetness, which is what makes them work in layered drinks without needing heavy syrups to compensate for bitterness. The naturally flavored coffees are built around beans that already carry the tasting note in the roast, so the flavor layer you taste is extraction-driven rather than additive.
The coffee processing guide on the Thejcoffeecollection blog goes deeper on how processing method affects which flavor compounds are available to extract, which matters when you are trying to highlight a specific layer. For readers who want to practice the recipes above, the sample packs are the lowest-friction starting point — six origins, each with a distinct flavor profile, so you can test how grind and temperature shift the extraction arc on different beans.
Ready to build your first layered drink with Thejcoffeecollection?
Skip the ingredient hunt. Thejcoffeecollection carries everything you need to practice the recipes in this guide: naturally flavored specialty roasts with built-in caramel, vanilla, and chocolate notes; a single-origin sample pack covering six world regions so you can compare how extraction affects flavor across different beans; and hojicha powder for the layered tea latte recipe.
Each product is sourced and roasted to perform at the 18–22% extraction window where sweetness peaks. Browse the full coffee collection and pick a starting point — then use the extraction settings and pour technique from this guide to build a layered drink tonight.
Useful sources and further reading
- The Extraction Sequence — JayArr / Deep Brew: The most thorough lab-level breakdown of Phase 1/2/3 chemistry, grind uniformity, and the 18–22% EY rationale. Start here for extraction science.
- Coffee Extraction Explained — ITA Coffee: Practitioner-focused overview of how controlling grind and temperature lets you stop extraction at the sweet peak.
- Mastering the Layering Technique — Papelespresso: The clearest practical guide to density-based visual layering and spoon technique for espresso drinks.
- Create Beautiful Layered Coffee Drinks — CoffeeMachineDe: Step-by-step procedural rules for layer assembly, including the 30–60 second milk rest.
- Interactive Coffee Taster’s Flavor Wheel — NotBadCoffee: Use this alongside your tasting notes to identify which extraction phase is dominating your cup.
- The Science of Coffee Extraction — 123 Food Science: Accessible breakdown of grind surface area, water temperature, and extraction yield for home brewers.
- Thejcoffeecollection Blog: Product-specific brewing guides, flavor profile comparisons, and sourcing notes for the beans used in these recipes.
Recommended
- Coffee Processing Methods Compared: A 2026 Flavor Guide – The J Coffee Collection
- Coffee Extraction Basics Explained for Better Brewing – The J Coffee Collection
- Coffee Flavor Profile Comparison: A Complete Guide – The J Coffee Collection
- What Is Flavored Coffee Infusion? A Complete Guide – The J Coffee Collection